Showing posts with label Comfort Food. Show all posts

Sunday, April 22, 2012

GF Cherry Drop Biscuits


Baking I like. Baking for a cause I like even more. My insanely geologically and hygienically gifted artisan-soap-maker-friend hosted a vegan bake sale to benefit Autism Speaks. While I relied on some classics like Banana Bread and Biscotti which are always get omnivore shout-outs, I wanted to make something gluten free for those who eliminate gluten from their children's diet as means to treat autism. I've dabbled in GF baking before with some wins and some serious failures, but overall my results have been above average. So I figured I'd take a chance, and if it didn't work out, at least I'd get something passable to feed the dog for her morning snack (hopefully).

The venture began with a recipe for gluten free scones. Translating recipes into vegan recipes is one of my greatest pleasures, but there are risks. In this instance, I didn't have cream or even a good vegan equivalent on hand (like soy creamer or coconut cream). So I used "buttermilk" by mixing up some almond milk and cider vinegar. I have made buttermilk scones before, but not with this recipe. Turns out, that thick cream was needed to keep the dough together. When I substituted with something much thinner, I was basically left with a batter. If you've ever made scones, you know that you're supposed to get a dough, something you can work in your hands. This was pourable - crap!

I didn't have scones anymore. BUT the batter still held together and had plenty of leavening in it, so I knew it would at least rise in the oven. Scoop by scoop, I dotted my baking sheet with dollops of what I had hoped would turn into fluffy biscuits. Ten minutes later - success! I had fluffy biscuits. Two minutes of cool time and one bite later - double success! I had fluffy and delicious biscuits. Autism sure had something to say about that.

GF Cherry Drop Biscuits
Makes: 12 biscuits
Total time: 20 minutes

Ingredients

3/4 scant c. almond milk
1 tsp. cider vinegar

1 1/4 c. rice flour
1/2 c. tapioca starch
1/2 c. cornstarch
1/3 c. sugar
1 T. baking powder
1/4 tsp. baking soda
1/4 tsp. salt
1/4+ tsp. xantham gum
6 T. Earth Balance
1/4 c. apple sauce
2 tsp. orange zest
1 c. cherries, chopped (fresh or thawed from frozen)

Directions

Preheat the oven to 425*F. Coat two baking sheet with cooking spray.

Combine almond milk and vinegar in a small mixing bowl. Whisk together and set aside.  In a medium bowl, mix the next 8 ingredients together. Drop in the Earth Balance one tablespoon at a time and use a pastry cutter or two knives to cut it into the flour. Keep mincing until flour is crumbly and no big pieces of EB remain.

Add the almond milk mixture and applesauce into the dry mixture and stir until just incorporated, trying not to work the batter too much. Fold in cherries and zest. Drop about 3 tablespoons of batter at a time on the baking sheets. Bake for 10-12 minutes or until the outer edges start to turn golden brown (don't wait to see a lot of gold here or they won't be fluffy!). Transfer biscuits carefully to cooling racks. When cool enough to handle, EAT.


Sunday, April 8, 2012

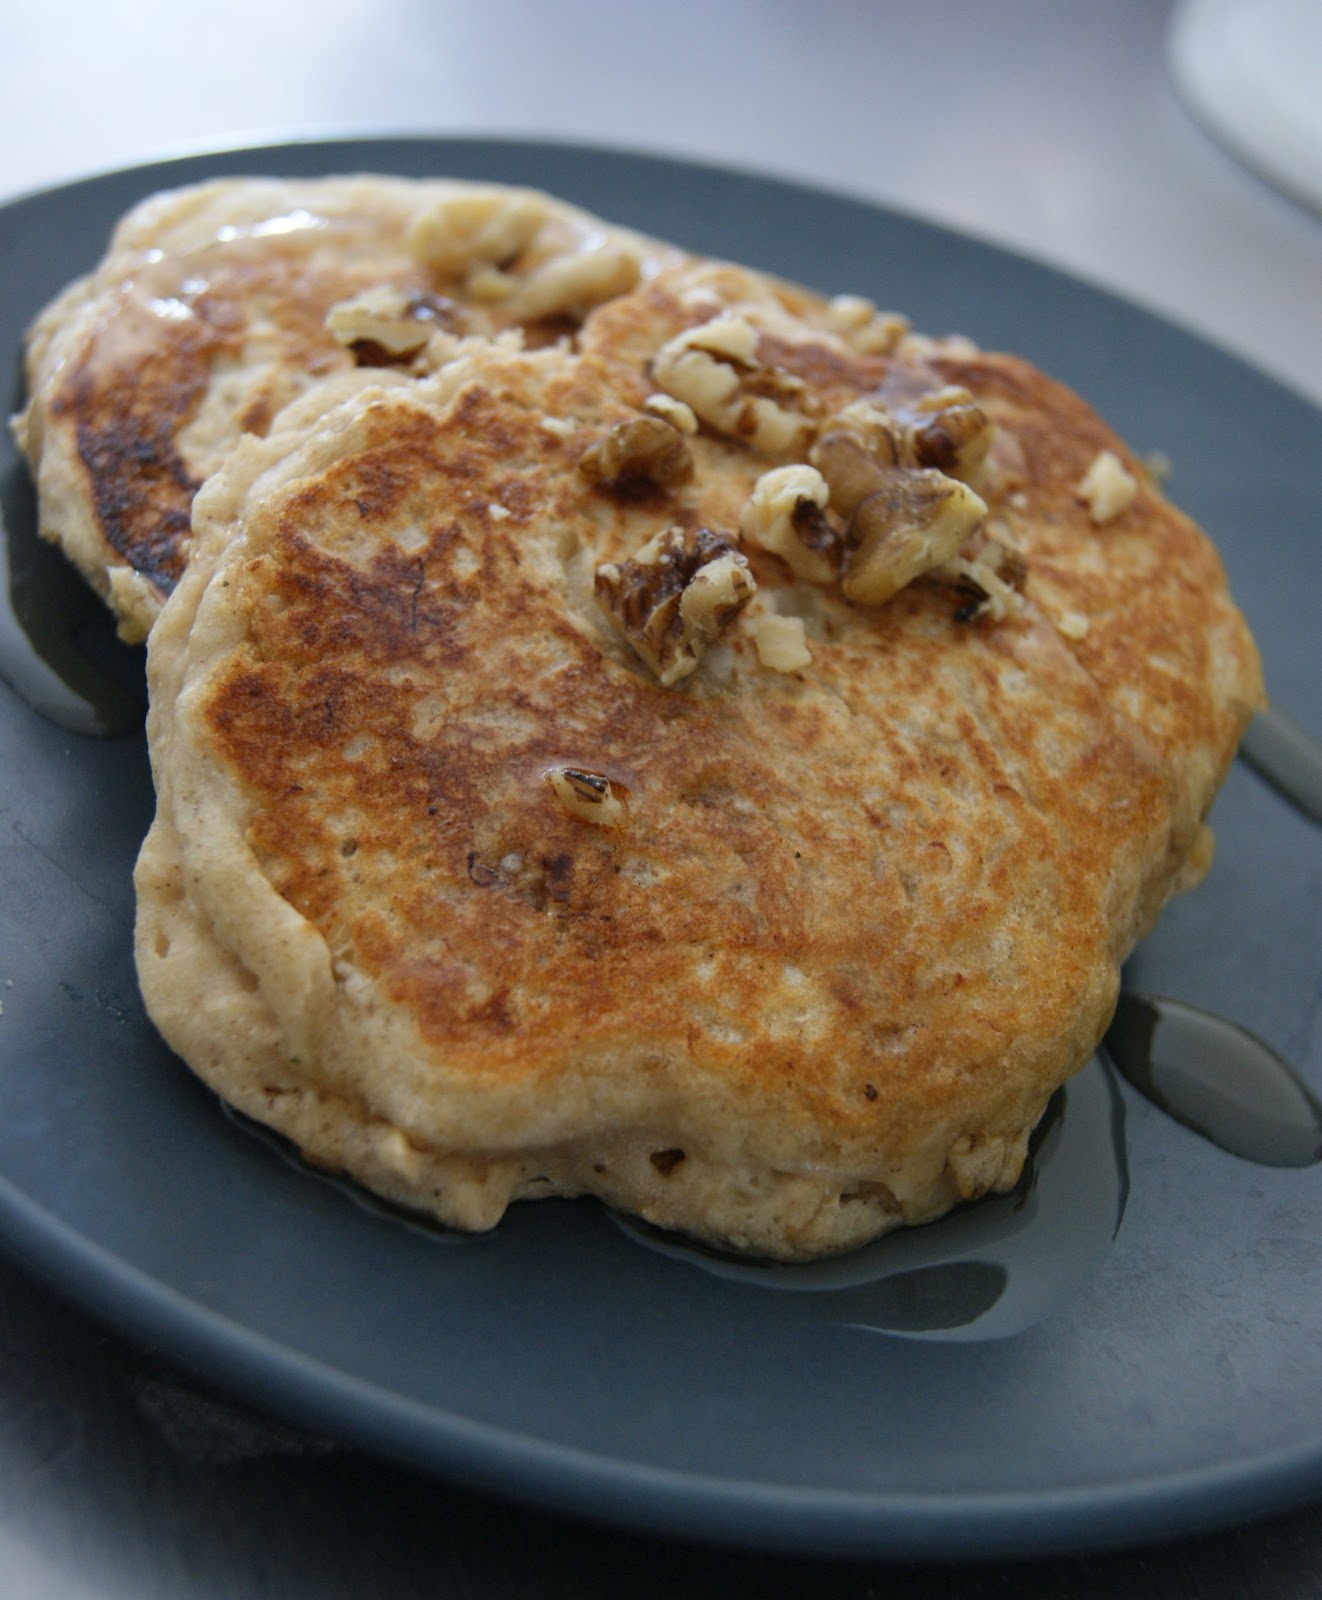
Banana Oatmeal Pancakes

Banana Oatmeal Pancakes with Walnuts and Old Fashioned Maple Syrup


The love affair started with my mother's banana oatmeal cookies - there are no words to describe the addictive qualities of these soft pillows of comforting joy. Anyone that has been around me for a few years know that "banana oatmeal" anything will turn my head and get some mean cravings started. I am known at work for my banana bread muffins and banana oatmeal cookies, constantly receiving requests for them at potlucks and birthday parties. So it was only natural that similar ingredients made their way into a pancake.


The means for putting this into action were sparked by seeing another recipe for banana oat pancakes that looked....okay... After reading feedback and reviews, better ideas started forming and in no time these hot cakes were on the griddle. So easy so scrumptious and sooooo much like banana oatmeal cookies flattened out and drizzled with maple syrup!

This recipe calls for very little sugar, so using a super ripe banana is critical for these coming out with a balanced level of sweetness. The high-fiber, protein-rich oats give the batter a cookie-ish texture that fluffs up really nicely in the pan despite not spreading like typical pancake batter. As long as you are not too finicky about the shape, and as long as your love banana bread like any sane person, you will fall in love with these.


Banana Oatmeal Pancakes
Makes: 8 pancakes
Total time: 25 minutes

Ingredients

1/2 c. all purpose flour
1/2 c. whole wheat pastry flour
1 T. brown sugar
2 1/2 tsp. baking powder
1/4 scant tsp. salt
1 medium (very ripe) banana
1+ c. almond, soy or rice milk
1 tsp. vanilla
1/4 tsp. almond extract (optional)
1/2 c. rolled oats

1/2 c. walnuts, chopped
Maple syrup (REAL maple syrup of course)

Directions

Mix flours, sugar, baking powder and salt together in a medium bowl. Set aside.

Mash banana until liquified and add remaining wet ingredients. Whisk until well blended. Add wet ingredients to dry mixture, adding more almond milk as necessary (depending on size and moisture of banana). Be careful not to over mix! Stir in rolled oats (batter will be pretty thick - it's ok). Let batter rest while skillet starts to heat.

Heat a large skillet over medium heat and coat with cooking spray - be patient, you don't want to the pan to overheat. When hot, scoop 1/4 cup of batter into pan and smear into sort-of-round shape (batter will be thick, so do your best and don't be too picky about the shape).  The pan should fit about 2 cakes. Cook pancakes on each side until just golden brown, about 1-2 minutes per side. Lower heat to just under medium to ensure pancakes crisp on the outside and cook all the way through.

Serve with a scoop of walnuts and small swig of maple syrup. Mmmmmmmm.

Sunday, April 1, 2012

Sweet Potato Quesadillas with Smokey BBQ Sauce


"I feel like something spicy for dinner."
"Like Indian?"
"Like Mexican. Refried beans and rice in a tortilla with hot sauce or something. Like a burrito."

The simple suggestions from my token omnivore are often what get my culinary wheels turning. In my head I'm thinking - burritos are simple. But we can do better.

After a bountiful trip to the farmers market this weekend, I came back with some "perfectly" sized sweet potatoes that seemed to have been grown just for me. At grocery stores, I often see sweet potatoes on steroids... a big orange reminder of American portion control issues. The tubers at the market were dainty and a petite, so I snagged a few to cook up single servings throughout the week. Well they also happen to cook more quickly, and when thinly sliced, fit perfectly inside a tortilla.

Chipotle and sweet potato, according to my palette, were made for each other. The smokiness and spice of the chipotle pepper can only be fully appreciated when paired with something sweet to accentuate its flavor (there is a reason Asian food is laced with sugar - sweet takes spicy to a new level). So I whipped up a quick BBQ sauce using a dollop of adobo sauce from canned chipotles. With a killer combination of sweet potatoes, Russet potatoes, and smooth refried beans, only a pinch of Daiya was needed to give these a full fledged, indulgently cheesy texture and taste.

The recipe for BBQ sauce is an approximation, so taste as you go and adjust accordingly. I also used a pinch of makeshift taco seasoning in each quesadilla. Though I included a recipe, packaged seasoning will work just fine. Get your glass of water ready, cuz these are smokin!

Sweet Potato Quesadillas with Smokey BBQ Sauce
Makes 4 quesadillas
Prep time: 15 minutes
Cook time: 10 minutes

Ingredients

1 small sweet potato, pierced a few times with a fork
1 medium Russet potato, pierced

4 whole wheat tortillas
1 c. Daiya
1+ c. refried beans
1 T. taco seasoning (recipe below)
1/2 c. Chipotle BBQ Sauce (recipe below)
Safflower or coconut oil
Fresh cilantro and green onions, chopped

Directions

First cook the potatoes: fill a medium sauce pan with enough water to cover the potatoes. Bring water to a boil and add potatoes. Cook until potatoes feel tender but not mushy, about 10-15 minutes (you should be able to pierce easily with a fork, but not pull the fork out smoothly). Remove potatoes from water and pat dry. Set aside to cool for a few minutes.

(While potatoes are cooking, prepare the taco seasoning and BBQ sauce.)

When cool enough to handle, slice the potatoes thinly into coin shapes, about 1/8 inch or slightly thinner. Set aside.

When ready to assemble, prepare one quesadilla at a time. Lay tortilla flat on a large plate and cover one half with a couple tablespoons of Daiya. Then cover cheese with a layer of alternating white and sweet potato slices. Spread the other half of the tortilla with about 1/4 cup (or 1/3 cup if you want a nice thick dilla). Sprinkle another couple of tablespoons of Daiya and a pinch of taco seasoning over everything. Drizzle with 2 tablespoons of BBQ sauce and fold carefully in half.

To cook, heat about 1/2 tablespoon of cooking oil over medium-high heat in a skillet. Add quesadilla when oil is hot and lower heat to medium. Cook until golden brown on each side, about 2 minutes. Be careful with the first one, as the pan tends to stay really it hot and will burn the tortilla easily.

Garnish with another drizzle of BBQ sauce, fresh cilantro and green onions.

Taco Seasoning
Makes about 1 tablespoon
Prep time: 2 minutes

Ingredients

1 tsp. chili powder
1 tsp. ground cumin
1/4 tsp. paprika
1/4 tsp. garlic salt
1/4 tsp. onion powder
1/4 tsp. dried oregano
Pinch of cayenne pepper

Directions

Combine all ingredients in small bowl.

Smokey BBQ Sauce
Makes 1/2 cup
Prep time: 5 minutes

Ingredients

1/4 c. ketchup
1 T. apple cider vinegar
2 tsp. brown sugar
2 tsp. chipotle adobo sauce
2 tsp. vegan Worcestershire sauce
1/2 tsp. yellow mustard
1/4 tsp. onion powder
1/4 tsp. garlic powder
Couple shakes of liquid smoke

Directions

Combine all ingredients in a small bowl. Cover a microwave for 45-60 seconds, or until sugar is dissolved. Adjust seasoning to taste.

Thursday, March 1, 2012

Chick au Poivre with Frites


Every now and then, or maybe a little more frequently than that, my token omnivore and I enjoy a good veg session on the couch with a good movie and snuggle time with the pup. This usually involves a meal eaten in our laps at each other’s sides which makes the experience wholesome and special. Most meals have a way of doing that, don’t you think?

So this week, after the hype of the Academy Awards, I was itching to see Hugo. For one, it takes place in Paris and I love all things French (except the B.O.). Plus, with Martin Scorsese in charge now donned with a fresh Oscar, it sounded like my kind of flick. This of course led me to believe we must have something French for dinner. The options however didn’t sound that appealing as I ran through the list of basic ideas: ratatouille, crepes, cassoulet, some kind of tart. Boring. Until I came across a recipe for Steak au Poivre.

To be honest, I was enticed by the French Fries in this picture during my research. So I started thinking about a steak replacement. Leftovers from last weekend’s ski trip? That’ll work! Both the cooked pasta and canned chickpeas needed to be used up before sliming over in the fridge, and I recalled reading a veggie burger recipe somewhere with a secret ingredient of pasta as a binding agent. Can’t remember the source, but the idea sure stuck.

A picture for inspiration and some fridge-clearing creativity brought me to this fabulous meal. Complete with, yes, frozen French Fries. We don’t have to be classy all the time.

Chick au Poivre
Makes: 4 patties
Cook time: 20-30 minutes

Ingredients

1 c. whole wheat or GF pasta, cooked
½ T. soy sauce, tamari or Braggs
½ T. vegan Worcestershire sauce
½ T. poultry seasoning
4-5 drops liquid smoke
¼ tsp. chick-un bouillon (optional)
1 c. chickpeas (drained and rinsed if using canned)

¼ c. tapioca starch
¼ c. rice flour
½ - 1 tsp. freshly ground black pepper
1-2 T. quality Dijon mustard
1-2 T. vegetable oil
Red Wine Glaze (recipe below)

Directions

Place the pasta in a food processor and process for 20-30 seconds, or until pasta is well ground. Transfer to a bowl and stir in soy sauce, Worcestershire, poultry seasoning and liquid smoke. Blend to incorporate seasonings. Add chickpeas to the mix and mash with a potato masher or fork to break up the chickpeas leaving some chunks.

Place tapioca and rice flours into a medium bowl and stir in your desired amount of ground pepper. Set flour aside for dipping.

Form the chickpea mixture into 4 circular or funky-shaped patties. Brush one or both sides with Dijon mustard and coat both sides well in the rice flour mix. Transfer to plate and/or refrigerate to firm up patties if desired.

Heat oil of choice in a nonstick skillet over medium-high heat. When pan is hot, add patties and cook until browned on each side, about 3 minutes per side.

Serve patties with a spoonful or two of Red Wine glaze and a good dose of French Fries!

Red Wine Glaze

Makes: about ½ cup
Cook time: 5-7 minutes

Ingredients

½ T. Earth Balance
2 T. shallots, minced
½ c. dry red wine
½ c. vegetable stock or broth
1/3 c. non-dairy milk or creamer of choice

Directions

In a small saucepan, melt Earth Balance over medium heat and add shallot. Cook 1-2 minutes or until softened. Add red wine and broth and increase heat to medium-high. Reduce by about half and add milk/creamer of choice. Reduce heat to medium again and cook the liquid down until sauce is nice and thick, using your judgment of when to pull the plug on the heat.

Wednesday, January 11, 2012

Spicy Cheezy Cauliflower Casserole


Last night we were getting ready to go to a show and decided we'd make dinner at home to save some moolah. My token omnivore opted for his very own grilled cheese. In a moment of laziness, my intention was just to whip up some cauliflower "rice" with other veggies in it and call it a night. But something happened. Some sriracha made its way into the pan and, the next thing I know, the Daiya cheese is beside me begging to be next. Low and behold, a masterpiece appeared. A delicious, cheesy, midwest-with-a-kick style hot dish.

As my other half chewed away at his semi-burnt sammie, I exuded "mmmmmm" after "mmmmmm" and finally came up for air with a "oh my god, you gotta have a bite." He looked at me with those envious eyes that told me his cheesewich was not very satisfying, begrudgingly leaned over and let his taste buds behold the wonder of this cheesy concoction. Then I got the straight up jealous look: "Yeah that's amazing."

So my mission tonight was to recreate this dish in a larger quantity fit for a complete meal. Served on top of a scoop of jasmine rice and beside a nice lil spinach salad, we were good to go. My other half added a couple of over easy (local, nest run) eggs between the rice and cheesy cauli to add some protein. Then after he was done with all of his "mmmmmm"s, he said "This is my favorite meal you've ever made. I want this for my birthday dinner, write that down." So here it is. I wrote it down.

Spicy Cheezy Cauliflower 
Makes: 2 servings 
Cook time: 30 minutes

Ingredients 

2 c. cauliflower flowerets, broken into small pieces
1/2 c. vegetable broth (bouillon or homemade)
2 garlic cloves, sliced 
3/4 c. zucchini, shredded or thinly sliced
1/2 c. red pepper, finely diced
1 T. apple juice (or extra broth*)
2-3 tsp. Sriracha
2 tsp. soy sauce or tamari
½ c. Daiya white cheese, shredded
2 T. reduced fat Veganaise (or other vegan mayo)
2 T. nutritional yeast 
Optional: 1/2 c. frozen peas, thawed

Directions 

Preheat oven to 400*F and spray a small baking dish with cooking spray.
Pulse the cauliflower in a food processor 20-25 times or until cauliflower is crumbly and resembles rice. Set aside.

In large skillet or wok, bring the broth to boil over medium-high heat. When boiling, add garlic. Cook for 30 seconds or so and add zucchini and peppers. Cook for another minute and add cauliflower. Deglaze the pan with apple juice. Stir in Sriracha and soy sauce. Reduce heat to medium and cook until most of the liquid has evaporated and cauliflower is al dente, about 3-4 minutes. (Add thawed peas if using here.) 

Fold in Daiya cheese, Veganaise, and nooch until thoroughly incorporated. Adjust seasoning to taste by adding Sriracha for more spice or a little more Veganaise to soften the spice.

Transfer cauliflower to baking dish and bake in oven for 15 minutes, or until the top has browned a little. Serve over rice or plain by itself! 

* The apple juice is just a touch of sweet to compliment the spicy. You can just use more broth with an optional teeny tiny pinch of sugar. 

Monday, December 12, 2011

Spaghetti Squash Gratin


Chilled to the bone. You midwesterners might call me sissy, but it's been c-c-c-cold down here. Which isn't a bad thing, because I love my warm clothes. And the only real cure for chilly weather and a downstairs without heating vents is something warm, soft and scoopable. Yep. Scoopable. The scooping is pivotal to the warming process.

Lately, I've come to adore spaghetti squash. I wrote a post long ago regarding my dismay at the hulabaloo around spaghetti squash, failing to find anything special about the stringy stuff. But for some reason, the fall of 2011 was the beginning of a magical season for me and the big yellow guy. An interest in getting away from too many grains and cooking with more of a variety of starches has been good for our relationship. We've grown. We're tight. With few calories and more nutrition, it's now my preference to actual spaghetti. I usually eat it al dente with all the same toppings you'd put on noodles.

That is, until I ordered a side of spaghetti squash at the local eatery across the street. While I typically like all veggies a little crisp (wth the exception of potatoes, duh), I realized how much I seriously undercook spaghetti squash. This lovely, soft, pillowy version of a squash I thought I had come to know gave me the ah-hah moment. This is why people love it so much. Buttery, smooth comfort. So with 1.25 spaghetti squash lying around, 1.5 cans of diced tomatoes, and about .25 bags of chickpea flour in the kitch, I curse the 56 degrees outside and set out to make myself a scoopalicious comfort good. Gratin.

I found one recipe that matched my mood for warm and scoopy with a nice tomato sauce, but of course it calls for a lot of cheese. Naturally my random mind came to a brilliant alternative - how about a socca on top? Since I'm so good at posting hyperlinks today, I also wrote a recipe for socca a while back. It's like a pancake made out of chickpeas. Yum. So instead of ricotta on top, I added a good amount of plant protein with a chickpea flour batter. It baked nicely in the oven and added an extra creaminess that made this perfect. Enjoy on a cold evening complete with red wine and more red wine.

Spaghetti Squash Gratin
Makes: 3-4 servings
Total cook time: 2 hours

Ingredients

1 medium spaghetti squash

2 tsp. olive or coconut oil
3 garlic cloves, minced
1 heaping tsp. basil
1 heaping tsp. oregano
1/4 - 1/2 tsp. crushed red pepper
2 14oz cans of diced tomatoes, in juice
Salt and pepper to taste

3/4 c. chickpea flour
3/4 c. almond milk
1 T. nutritional yeast
1 T. cornstarch
Salt and pepper to taste
Pinch of nutmeg and white pepper

3/4 c. shredded vegan cheese, such as Daiya or Kase (optional)

Directions

Preheat oven to 450*F. Fill a large roasting pan with 1/2" of water.

Cut squash in 2 or 4 pieces and scoop out the seeds. Place squash flesh side down in roasting pan and cover with aluminum foil. Roast in oven for 40 minutes or until very tender.

While the squash is cooking, prepare the tomato sauce. Heat oil over medium-low heat and cook garlic slowly until fragrant, about 1-2 minutes (being careful not to burn). Add herbs and crushed red pepper. Stir for another 30 seconds and add tomatoes, salt and pepper. Increase heat to medium high and bring sauce to a low boil. Reduce heat to medium and cover. Simmer sauce for 20 minutes or until the "canned-ness" is cooked out of the tomatoes (alternatively, you could make your own fresh tomato sauce instead of being a bum like me).

While the sauce simmers, prepare the socca batter. Combine all ingredients in a medium bowl and set aside to rest. At this point you should be able to return to the baking squash. Remove from the oven when tender and reduce temperature to 375*F.

Using a spoon, lift the squash flesh away from the skin (sounds gross like a freshman year biology class). Season with salt and pepper to taste and tranfer to a casserole dish. Layer the bottom completely with squash and cover with tomato sauce. Sprinkle half of the cheese over the sauce (if using) and cover evenly with batter. Sprinkel remaining cheese on top and bake for 45-55 minutes, or until socca has set and browned on top.

Let cool 10 minutes before serving (we both burned our tongues getting a little antsy).

Friday, August 19, 2011

Pasta with Creamy Truffle Sauce


I got a little ambitious last weekend with dried beans. My dear red headed curly-Q and I headed to Flagstaff for some escape from the blazing Phoenix sun and wanted to make the weekend cheap. We did a pretty good job considering we made one trip to the grocery story and ate out once for breakfast. To keep the food cost down I grabbed a jar of beans and a jar of rice (that is how I store my bulk foods - in old applesauce jars) and a can of those spicy fire roasted tomatoes I've been so keen on for the past few weeks.

At first I thought that making a big batch of beans would be a good way to save some prep time throughout the next week. So I cooked up a bunch of anasazi beans, made our lovely dish in Flagstaff using half the amount and headed back to the heat with the leftovers. Each night throughout the next week I looked at those beans and thought "uhhhh so what do I do with these now?"

We tried a couple of things at home - beans and potatoes, roasted eggplant "hummus" but by the time I came up on the very last scoop, I just had to get rid of these suckers. I'm a three bean salad kind of girl, I don't like to stick to one variety for too long. So one additional idea came to mind. While many vegan sauce recipes out there feature pureed beans, I had never really tried it myself. It seemed like the sauce would be too lumpy. Sure I'll use a good pinch of garbanzo flour once in a while, but as a base? I wasn't convinced it would actually be creamy.

That's because I didn't my food processor enough credit or enough time to do it's thang. Patience. When you let it go for more than a minute, it really gets its groove. It tore through those beans after adding enough broth and gave me a straight up sauce in about 4 minutes. With a couple of flavor punches like truffle spread and a garlic, this dinner was no effort. Don't have a jar of truffle spread floating around? Go to an Italian grocer or substitute with olive tapenade, mashed roasted garlic cloves, or another paste-type item with a strong flavor. I'm convinced this could even be served in a diner and pulled off as gravy. Mmmm comfort food.

So wait, I said anasazi beans above and it says cannellini beans below. So which is it? I figure if red beans were delicious, cannellini would be down right spectacular. You make the call.


Pasta with Creamy Truffle Sauce and Oyster Shrooms
Makes: 3-4 servings
Cook time: 15-20 minutes

Ingredients

1 c. cooked cannellini beans
1 clove garlic
2 T. nutritional yeast
1 heaping T. truffle-mushroom pâté or spread
1 tsp lemon juice
½ tsp sea salt*
1 ½ - 2 c. broth (homemade or from bouillon)

1 T. olive oil
3 c. oyster mushrooms
Pinch of salt

Any kind of pasta cooked according to package directions
Freshly ground black pepper

*Note: reduce the salt if using broth made from bouillon.

Directions

In a food processor, combine beans, garlic, nutritional yeast, truffle pâté, lemon juice and sea salt. Process on high and slowly add broth through the chute, half a cup at a time until desired thickness is reached. Process until sauce is completely smooth, about 4-5 minutes. Transfer sauce to a saucepan and heat over medium low until bubbling.  Turn heat all the way to low. If mixture is too thin, let the sauce bubble until it thickens, whisking constantly to avoid clumps.

While the sauce is heating, prepare the mushrooms. In a skillet, heat the olive oil over medium-high heat and add the mushrooms without crowding too much. Cook for 4-5 minutes or until mushrooms are tender. Season with a pinch of salt.


To assemble, top prepared pasta with a generous helping of mushrooms. Top with ¾ cup of sauce and a good grind of black pepper.


Thursday, August 11, 2011

MexiTempeh with Cheesy Polenta


Leafy greens. Not featured in the title of this recipe, because this recipe is for those that don’t like leafy greens. For the vegetarians that hate vegetables. For the children that grew up on hot dish. This dish is every bit as comforting as the mysterious casserole and every bit as convenient as the sensational Hamburger Helper. Ok, maybe not every bit as convenient, but this is super easy. You have no excuses.

Back to the leafy greens. Hopefully everyone knows by now that these sturdy green leaves pack a lot of nutrition. Kale is now commonly referred to as a super food, and it is. Other types have just as much bang for their buck. Chard, beet greens, mustard greens – these are all not only healthy but they each have unique flavors and complexities. The trick is in preparing them with enough complimentary flavor to counter some of the minor challenges they have. One being bitterness and the other being texture. Cooked too short, they will be bitter and chewy. Cooked too long and they will be flavorless mush.

In the case of veg haters, the nutritional components and soft flavors of greens matter not. It is those that cook for veg haters that must meet the challenge. I am one of those cooks. Do I criticize my fellow herbivores or loving omnivores for hating on greens? I could never be so harsh. But I will sneak them into my meals. All of them.

One of my new favorite go-to greens is the Trader Joe’s bag of braising greens – conveniently washed and chopped for your green-sneaking pleasure. Whole Foods has also starting offering braising green in bulk next to the salad greens. So now you really have no excuses! For this particular recipe, the spicy pizazz of cumin and chili powder will help to mask your good intentions as well. The only thing I haven’t figured out yet is how to make the greens invisible.


MexiTempeh over Cheesy Polenta
Serves: 2
Cook time: 25 minutes

Ingredients

2 tsp. canola oil
½ medium onion, diced
2 garlic cloves, sliced or minced
½ pkg tempeh, crumbled/broken into large chunks
2 tsp. cumin
1 tsp. oregano
½ tsp. chili powder
½ tsp. paprika
½ tsp. black pepper
¼ tsp. salt
(If you don’t have all those, use 1-2 T. taco seasoning)
¾ c. canned fire roasted tomatoes with chilis such as Rotel
3 c. leafy greens (collards, kale, mustard, chard etc.)
2 tsp. flour (garbanzo, potato or all purpose)
Dash of cinnamon
¼ c. cilantro, chopped

Directions

In a deep skillet, heat oil over medium-high heat and add onion. Cook until translucent, about 3-4 minutes. Add garlic and cook another 30 seconds until fragrant. Stir in crumbled tempeh and spices. Cook until tempeh starts to brown, about 8-10 minutes, stirring every couple of minutes.

When pan starts to become dry, add in tomatoes and leafy greens. Add ¼ cup of water if mixture is too thick to make a light sauce. Sprinkle flour over stew and stir to thicken. Cook another 5-7 minutes, or until greens are wilted and tender. Turn the heat off. Sprinkle a faint dash of cinnamon over the top and stir in cilantro. Season with salt and pepper to taste.


Cheesy Polenta

Ingredients

2 c. Water
½ c. Polenta
½ tsp Salt
1 tsp garlic powder
1 tsp onion powder
½ tsp miso paste
¼ tsp turmeric
¼ tsp salt
2 T. Nutritional Yeast

Directions

In a large sauce pan, bring water to a boil. Slowly add polenta in an even stream, whisking vigorously to avoid clumps. When polenta comes to a boil, lower heat to low and add in remaining ingredients. Let polenta simmer another 15 minutes or so until tender.

Tuesday, August 2, 2011

Braised Celery with Mustard Mash


Celery Heads - they grow so big. And though that's what we all want from a seedling, sometimes a whole head of celery is just...a lot. I get excited about the outer crunchy stalks for a few days, maybe dip them in hummus or use them to make jambalaya, then tuck the rest away for another day. Then another week goes by and the last few stalks call it quits. But it's almost a resentful kind of quits because my celery never gets soggy or brown, it just wilts. "See me? I'm green still. But I've lost my snap. Thanks to you." That's what my celery says to me when it passes its dipper or scooper prime. So what can be done with that limp, abandoned and seemingly hopeless last bit of celery hiding in the back of your "crisper" that hasn't done too well in keeping your green stalks crisp? Embrace it. Ah-hem, excuse me, em-braise it.

Braising is a lovely technique if you have a dose of patience and an eye for when to stop the heat. It can be perfect for yielding effortless sauces but a curse if you neglect your veggies to the point of mush. It really doesn't take that long, and the ingredient list is short. The method works well on almost every vegetable, particularly those that have already lost their oomph. While I don't typically think of celery as a main gig in any dish, it's a terrific star in this fabulously simple dish.

Now let's get to the potatoes. But more seriously, let's get to the mustard. I had some mustard mashed potatoes on, of all places, an airplane. Yes first class on a transatlantic flight has its benefits, one being meals that more closely resemble food. Ever since the flight back from Italy, I can't mash potatoes without mustard. Stone ground, semi-sharp. I use Annie's Horseradish Mustard in these potatoes because I love anything with horseradish in it. For those that don't care for it, you can use any other stone-ground mustard or maybe even get funky with a Sierra Nevada Stout or Porter variety.

As for the crunchy peas - so many braised celery recipes I found used some kind of bacon or pork fat to flavor the celery. While that makes me wanna hurl just a little bit, I appreciate what the smokiness of bacon might contribute. Personally, I though using vegetable bouillon was more than enough to keep the celery flavorful, but I was curious about the bacon. So I concocted a little something as a garnish of sorts to just throw on top for fun. It was fun. It tasted fun. And I think my poor neglected celery-turned-belle-of-the-ball felt extra special too.


Braised Celery with Mustard Mashed Potatoes
Makes: 3-4 Servings
Prep time: 15 minutes
Cook time: 30 minutes

Ingredients

For the celery
2 tsp olive oil
1/2 c. leeks or onion, sliced thinly
2 c. celery, chopped
1 1/2 c. vegetable broth
1/2 T. flour (chickpea or all purpose)
2 bay leaves
Salt and pepper to taste

For the mashed potatoes
2-3 medium russet potatoes, cubed
1 T. stone ground mustard
1/2 T. Earth Balance
1-2 T. nutritional yeast
Salt to taste

Optional Topping
1/2 c. peas (frozen or raw, thawed if using frozen)
1 T. Veggie bac'un bits 

Directions

To make the celery: Heat olive oil in a deep skillet over medium high heat. Add onions and saute until translucent, about 5 minutes. Add celery and continue to cook 3-4 minutes more. Add bay leaves and broth, stirring to make sure celery is dispersed in an even layer throughout the pan. Sprinkle the flour over the top and cover. Cook 15-20 minutes, stirring every few minutes, until celery is tender to your liking.

To make the potatoes: In a large sauce pan, bring potatoes to a boil. When boiling, reduce the heat to medium and cook at a low boil for 10-15 minutes or until a fork passes easily through the potatoes. Drain potatoes when done, reserving the cooking water for the mashing. Return the potatoes back to the warm pot and mash with a form or potato ricer. Add mustard, nutritional yeast, Earth Balance and 1/4 to 1/3 cup of the cooking water. Continue to mash until everything is incorporated and smooth. Add salt to taste.

Optional topping: Coat a small skillet with cooking spray and heat the peas until just warm and sizzling. Add bac'un bits and remove from heat. Stir until bac'un bits have warmed and use as garnish over potatoes and celery.

To assemble: Shape a big messy pile of potatoes into some kind of round volcano shape. Pour 1/2 cup of braised celery in the middle and top with a lil smokey scoop of green peas. Indulge.

Friday, January 14, 2011

Quinoa Gratin with Roasted Rutabaga and Spinach

Every time I gear up to write about why I made a particular recipe, my first thought is “I needed to get rid of…” and I’m now starting to think that this is my token kitchen strategy. I used to read through recipes and then buy ingredients for them. Now I buy vegetables because they are aesthetically pleasing and woo me at the market. Then I get home and have to find a way to use them which often translates as “getting rid” of them. (Perhaps I’m not doing them enough justice with my semantics). The other common scenario of “cooking to kitchen cleanse” is dealing with leftovers.

In this case I had overestimated a batch of quinoa, cooking up a whole cup of dried grain. I ended up with a lot of leftovers and though there is usually no problem using up cooked quinoa, I was on a green salad craze last week and didn’t notice the quinoa until it had almost reached expiration. For the first time in a long time, I looked up quinoa recipes.

Quinoa makes a great pilaf and a great filler ingredient in dishes such as fritters and veggie patties. But I didn’t feel like patting cakes and I didn’t feel like going through the fuss of marinating tofu or tempeh as a main dish to go alongside a quinoa pilaf. So I looked for less conventional recipes and found a slew of them for quinoa gratin. My only experience with gratin was in the context of potatoes. Know I understand gratin is more a technique that involves a browned crust, cheese, and eggs. Of course a dish that screams of all things non-vegan is one I must veganize.

Most of the recipes called for 3-5 eggs so clearly the common egg substitutes (applesauce, flax or a flour egg-replacer) were not going to cut it in this dish. It made me think of a quiche-gratin hybrid, though I placed the emphasis to be on the grain, not the “egg” which is of course the overwhelming texture in quiche. This then became more of an omelette project, kind of like Spanish tortilla (which I now think is possible after making this and will attempt soon). The first recipe to come up on my search for “vegan omelette” was of course from the Fat Free Vegan blog and I based my “egg” portion off of Susan’s Vegan Omelette for One. I added a little more moisture and used vegetable broth to make it more savory. This came together beautifully: perfectly golden crust, moist and flavorful filling, with tender bits of sweet rutabaga. The taste was very fancy for how easy it was to prepare.


Quinoa Gratin with Roasted Rutabaga and Spinach
Makes: 2-3 servings
Prep time: 15 minutes
Cook time: 1 hour

Ingredients

1 small rutabaga, cut in 1/2 inch cubes
1 tsp olive oil
Salt & pepper

6 oz. silken tofu (extra firm)
3 T. vegetable broth
3 T nutritional yeast
1 T cornstarch
1 tsp tahini
1/2 tsp salt
1/4 tsp onion powder
1/8 tsp turmeric

1/2 medium onion, chopped
1 large garlic clove, minced
1/2 tsp dried thyme
1/4 tsp dried rosemary
1/2 c. mushrooms, chopped
2 c. spinach
1/4 c. vegetable broth from bouillon
1 1/2 c. cooked quinoa
Salt & pepper

Directions

Preheat oven to 450F.

Coat rutabaga in olive oil and sprinkle generously with salt and pepper. Roast in oven for 30 minutes, turning vegetables half way through to ensure all sides are browned. Remove and set aside.

While rutabaga cooks, prepare the "egg" portion. Combine tofu with next 7 ingredients in a food processor or blender and process until completely smooth. Set aside.

Lower oven to 375F.

Heat a medium skillet over medium-high heat and coat with cooking spray. Add onions and cook until they start to become translucent, 5-6 minutes, spraying onions with more cooking spray if pan becomes too dry. Add garlic, herbs and mushrooms, turning mixture to coat well in spices. Cook another minute until garlic is fragrant. Add spinach and broth and cook until spinach wilts, about 30 seconds. Stir in quinoa, roasted rutabaga, salt and pepper and remove from heat. Transfer to a medium mixing bowl.

Pour the "egg" mixture over quinoa and stir to mix well. Season with additional salt and pepper if desired. Bake in oven for 30 minutes or until gratin is set and the top starts to brown. Remove from oven and let sit 5-10 minutes before scarfing down!

Tuesday, January 11, 2011

Broccoli Cheese Soup

Chilly, dreary weather in AZ is often a welcome change from the norm - typically short-lived but just enough to instill a vague sense of nostalgia for seasonal weather patterns. Last week was colder than usual which set a good stage for curling up with a good book and hot bowl of soup.

I have been making a lot of chunky vegetable soups this winter such as cabbage, lentil, and root vegetable stews – all of which are lovely. But last week, the lack of constant sunshine coupled with the lack of enthusiasm to be at work was really starting to wear on me. I looked out the window to see only clouds and a high of 52 (I know Midwesterners, hush) and thought that chunky vegetable soup just wasn’t going to cut it. Dreaming of warm, comforting food for dinner I started mentally raiding my cupboards for ideas.

The only thing I really wanted to get rid of was a pair of Russet potatoes. I’m more of a sweet potato person, but I had purchased some regular old baking potatoes after getting the stomach flu in order to have a less complex food on hand. But then I got better and the potatoes got lost, so they had to go quickly or they’d sprout right through the counter. The only semi-fun thing I had was broccoli, so I started thinking of what I could do with potatoes and broccoli in the mix. The thought process went something like this.

Baked Potato  >  Loaded Baked Potato  >   CHEEZY loaded baked potato  >  Cheezy Soup  >  Broccoli Cheez Soup!! (poured over Baked Potato)

And so the venture began. I did my customary recipe hunt to get a basic idea of how a vegan might go about making a cheese soup and then branched off on my own. Of course the recipe mirrors the process of making vegan Mac ‘n Cheez or vegan Nacho Cheez, but I wasn’t sure how it would hold up as soup. Turns out, it’s friggin’ yum! My test taster agreed it tastes like the real deal, and I am fairly certain the mustard gives it a certain oompf that is quite necessary to achieve the cheesy taste. While I ended up having the potato on the side, I did transpose the idea of a loaded potato to garnishments for the soup: toasted pine nuts and bac’un bits. So it was more of a loaded soup, but that sounds weird.

Broccoli Cheese Soup
Makes: 2 servings
Prep time: 5 minutes
Cook time: 10 minutes

Ingredients

2 c. broccoli and/or stems, chopped

1 c. vegetable broth from bouillon
1/3 c. nutritional yeast
3 T. flour (potato or all purpose)
1 T. Earth Balance
1 tsp mustard
¼ heaping tsp. onion powder
¼ heaping tsp. garlic powder
¼ tsp. salt
½ - ¾ c. almond milk
Pinch of white pepper

Garnishments (optional): toasted pine nuts, bacon bits

Directions

Steam broccoli for 5-7 minutes or until desired texture is reached. Remove from heat and set aside.

Prepare vegetable broth by boiling water and mixing in a ½ cube of bouillon. Combine next 7 ingredients in a sauce pan and heat over medium-high heat. Whisk in vegetable broth. When soup starts to bubble, lower heat to medium and slowly add in ½ cup of almond milk. Add more if soup is too thick or starchy and. Finish with a pinch of white pepper and stir in broccoli. Top each bowl with a table spoon of pine nuts and/or a dash of bacon bits. Serve with crusty bread or a baked potato.

Thursday, December 9, 2010

Lentil Loaf with Mushroom Gravy

Really this was all about the potatoes. Flying back from Pittsburgh yesterday, I of course was contemplating what to make for a nice welcome home dinner upon my return. Though my fridge is stocked with loads of veggies from my most recent episode at the farmer’s market, these little fingerling potatoes have sitting in their bowl patiently for 2+ weeks begging to be roasted. Red, purple, and white: olive oil, salt and pepper. They exude the simplicity of cuisine: colorful and delicious without much effort. The effort was in dreaming up something worthy of being paired with roasted fingerling potatoes.

My natural tendency is to think, “What would roasted potatoes be served with at a ‘normal’ meal?” Yes, I am at fault for relating my “unreal” vegan cooking with its “real” evil twin. After doing this for a couple of years and cooking for many skeptics, I have developed a sense of obligation to prepare meat analogues at most meals to win the hearts and stomachs of naysayers. There is a certain pressure, whether real or made-up, to produce a delicious version of something that a carnivore would have eaten were I not at the stove. Vegan analogues are a great demonstration of vegan cooking’s potential, but sometimes they are limiting and boring – I mean, really, I could make something MUCH better than a vegan burger or vegan taco casserole. To counter this pressure, I’ve been trying to be more creative than just making a “vegan version” of a common meat dish.

This however is not one of those creative deviations. When you think about roasted potatoes, they have to be served with something that will provide enough contrast to appreciate them – something hearty, warming and filling. While I tried to entertain the notion of creating something other than a meat analogue, none of the alternatives were good enough. Pasta or risotto…too starchy. Stew…too gloppy. So it had to be a hunk of protein. Since I’m not into making seitan steak right now (avoiding gluten), I went with meatloaf. Though I’ve read many vegan loaf recipes, I had not given it a serious shot until now.

I didn’t bother with a recipe, because I was trying to clean out a few things in the fridge anyway. The end result? The lentil loaf came apart easily because I didn’t use much of a binding agent, but it was absolutely scrumptious. The gravy was easy peasy, much healthier than its counterpart and perfectly flavorful. The potatoes – how could something so perfectly purple NOT be delicious?

Lentil Loaf with Mushroom Gravy
Makes 2-3 servings
Total prep time: 1 ½ hours

Ingredients

For the loaf
1 c. lentils cooked or ½ c. dry lentils
Cooking spray
½ medium onion, chopped
1 large celery stalk, chopped
½ large carrot, chopped
1 large garlic clove, minced
Pinch of salt
¼ - 1/3 c. walnuts
½ c. brown or white rice, cooked
1 tsp. poultry seasoning
1 tsp. oregano, dried
½ tsp rosemary, dried
½ tsp. salt
½ tsp black pepper
¼ tsp. allspice

For the gravy
¼ c. dried mushrooms
1 ¼ c. water2 tsp. Earth Balance
2 tsp. Potato flour (or other)
½ T. Soy sauce or tamari
¼ tsp. black pepper
Dash of white pepper
Dash of nutmeg
Dash of garlic powder

Directions

(If you have precooked lentils – skip this step.) Bring dry lentils to a boil in 4 cups of water, reduce heat to a simmer and let lentils cook until tender, about 45 minutes. Drain and set 1 cup of cooked lentils aside.

Preheat oven to 350ºF. Coat a loaf pan with cooking spray.

Heat a skillet over medium heat and coat with cooking spray. Add onions, celery and carrots. Cooking until vegetables just become tender, about 5 minutes. Add garlic and a pinch of salt, stirring vegetables to coat. Cook vegetables another couple of minutes until starting to brown. Remove from heat and transfer to food processor with lentils.

Add walnut, rice and seasonings in food processor and pulse until mixture is crumbled. Processes until mixture clumps together well and press into loaf pan (this amount will not fill an entire loaf pan, so just pat into a shorty).

Bake in oven until loaf has set, 40-45 minutes.

While the loaf is baking, make the gravy. In a small sauce pan, bring the mushrooms and water a boil and cook until liquid is slightly reduced and dark brown, 7-8 minutes. Drain mushrooms, reserving liquid. In the same pan, melt Earth balance over medium-heat and add flour. Stir until butter is absorbed and cook another minute. Whisk in mushroom broth and reduce heat. Stir in soy sauce (tamari) and seasonings. Add water if gravy is too thick and additional salt to taste.

Serve loaf with gravy and go mmmmmm.

Tuesday, November 2, 2010

Vegan Hachis Parmentier: BB Shepherds Pie

Classic French cuisine is mouth-watering, aromatic, and beautiful but not terribly vegan-friendly. Let’s have a brief glimpse at the typical French fare: croque-monsieur, coq-au-vin, soufflé, paté, bouillabaisse, crème brulée. Meat, cheese, butter, and cream in any form you could possibly concoct. Translating French to English might be a forte of mine, but the challenge of translating French recipes into meatless meals is much more fun and very much a vegan venture. And just in time for the holiday season, amidst my search for a vegan offering that will satisfy my need for challenge and impress my omnivore audience, my NPR addiction paid off - All Things Considered did a segment on cooking French with shortcuts featuring a dish called Hachis Parmentier (wha?).

This is essentially a Beef Burgundy or Boeuf Bourguignon Shepherds Pie, a classic meat and potato comfort food. I recently tried a similar dish with a biscuit topping, but it came out all biscuit. So I thought I’ve give tubers a shot. It was incredibly easy and I loved how well the potatoes browned in the oven. Bite by bite, I became more convinced that this will be a Thanksgiving or Christmas highlight. Why does it make perfect holiday fare? It’s salty, meaty, dark, rich, tender and it doesn’t scream vegan. That seems to be the equation that works with my family anyway. They don’t take to seitan roast or Tofurkey as well as something smothered in gravy and topped with starch.

A good trick to giving tempeh a meaty flavor is to simmer it in seasoning. I actually didn’t have vegan Worcestershire sauce, so I made my own and just put threw the tempeh in the sauce pot. If you choose to use seitan, this method doesn’t work the same way as it softens the seitan too a near mush – use the marinade method instead. The traditional recipes would have you remove the vegetables only using the stock and “meat,” I think that’s a travesty and insult to the savory chunks responsible for the flavor. Save the veggies! Don’t let them cook in vain. The classic also mixes Gruyere into the potatoes. I personally did not use vegan cheese, but Daiya might be a nice addition if you’re into it. This passed the omnivore test. I recommend enjoying with a bottle of red.

Vegan Hachis Parmentier
Makes 4-6 servings
Total cook time: 1 hour

Ingredients:

For the “Beef”
3-4 T. vegan Worcestershire sauce
1¼ c. water
1 pkg tempeh, cubed or 2 c. seitan, cubed
Cooking spray

For the Stew
2 T. olive oil
1 small onion, diced
2 stalks celery, chopped
2 carrots, chopped
1 small turnip, chopped
1 c. mushrooms, chopped
2 large garlic cloves, minced (1½ T)
1 bay leaf
1 tsps thyme, dried
2 T. tomato paste
2 c. vegetable broth (from bouillon)
½ - 1 c. water
2 tsp cornstarch
Salt and pepper

For the Potatoes
2 large russet potatoes, cubed
2 T. Earth Balance
¼ - ½ c. almond or soy milk or creamer
Pinch of salt
¼ c. parsley or chives
½ c. vegan cheese (optional)

Directions

Cooking suggestion: The tempeh or seitan can be prepared before or at the same time as the stew. Preheat the oven to 400ºF and cook potatoes while the stew simmers.

For the “beef”: If using tempeh, bring the Worcestershire sauce and water to a boil and add tempeh. Lower heat to medium and let sauce reduce by half, stirring tempeh occasionally to make sure all cubes are coated evenly about 8-10 minutes. When reduce, strain tempeh reserving sauce. Heat a skillet over high heat and coat with cooking spray. Brown the tempeh until cooked evenly on all sides. If using seitan, mix Worcestershire sauce with ¾ c. water and marinate seitan in a medium bowl for 20 minutes. Brown the tempeh until cooked evenly on all sides Set aside to add to stew.

For the stew: In a large sauce pan or wide, deep skillet, heat the olive oil over medium heat. Add onions, celery, carrots and turnips. Cook until vegetables soften, 8-10 minutes. Add mushrooms, garlic, bay leaf and thyme. Stir in tomato paste and cook 1 minute before adding vegetable broth and ½ cup of water. Bring stew to a boil and reduce heat. Let simmer for 15 minutes. Mix ¼ cup of water with cornstarch and whisk into stew. Add “beef” and ¼ cup of reserved Worcestershire. Season with salt and pepper to taste. When stew has thickened, remove from heat and transfer to casserole dish.

For the potatoes: Bring a large pot of water to a boil and add potatoes. Reduce heat and simmer until potatoes are tender. Strain the potatoes and mash with Earth Balance, “milk” of choice, and pinch of salt. Stir in parsley or chives and cheese if using. Spread potatoes over stew in a single, smooth layer.

Bake in oven for 30 minutes or until top is golden brown. Let cool 15 minutes before serving. Garnish with parsley if desired.

Sunday, October 17, 2010

Chunky Vegan Chili with Oven-Baked Fries

For about a week the blazing Arizona sun succumbed to a change in air pressure and brought a sense of relief just when I thought fall might abandon us this year. Translation: it chilled the hell down for a few days. Overwhelming illusions that it was time to break out the stockpot and possibly a cashmere sweater were brought into check eventually, but I did seize the small window to squeeze in a cool-weather dish. A comfort food craving came on with an itch for spice, so chili was the obvious choice.

I don’t have extensive chili experience, but it’s one of those dishes that give a certain flare to the reputations of real cooks. Do you recall ever hearing of someone who made a “decent” chili? Do you have a favorite cafe that makes a “pretty good” chili? Of course not. Mediocre chili does not invoke or enliven the soul in a blissful tango with taste. Those who make incredible chili leave a mark. That delectable memory gets to camp out in a special place reserved for things like Mom’s Chicken Noodle Soup and Grandma’s Swedish Kringle. Chili hits a spot that is best reached after raking leaves or building snowmen - a spot which is not as easily accessible in my current environment as it was when I was little. Therefore I have to seize every semblance of opportunity I get. Which means, when it drops below 90, I can pull out the crock pot.

Now that I’ve built up chili so much - it might be a let-down to learn that this is not the recipe that will make me an infamous vegan chef. It’s not my best, worst, or last attempt. But it was very exciting prancing around the kitchen throwing in spices Emeril-style...BAM! In fact, I based this off of one of his recipes and it turned out quite well. I think I need more onion next time, because soups never seem to have enough. Regardless of it’s small imperfections or opportunities for enhancement, the enthusiasm was doubled by the batch of french fries so perfectly prepared by my loving omnivore. Chili and fries! I can’t seem to pair the two together without an exclamation point!

Chunky Vegan Chili
Makes 4-6 servings
Total cook time: 40 minutes

Ingredients

2 T. Olive or Canola oil
1 1/2 c. Onion, chopped
2 T. Garlic, minced
1 Anaheim chili, chopped
1 Summer squash, chopped
1 c. Yellow corn (1-2 ears)
1 c. Brown or portobello mushrooms, chopped
1 c. Garbanzo beans, cooked or canned
4 Tomatoes, chopped
1 Chipotle chili in adobo sauce
2 T. Chili powder
1 T. Cumin, ground
1 tsp. Salt
1/4 tsp. Cayenne or piquin pepper
1 tsp. Oregano, dried
1 can Tomato sauce
1 c. Vegetable broth
Pinch of sugar

6 oz Tempeh, chopped or sliced
Taco seasoning: 1 tsp each - chili powder, paprika, garlic powder, and onion powder

Toppings

Shredded vegan cheese
Chopped red onion
Chopped avocado

Directions

In a large stockpot, heat the oil over medium heat and add the onions. Cook until the onions are soft and transparent, about 10-12 minutes. Add garlic and Anaheim pepper. Cook another minute and add squash, mushrooms and corn. Cook vegetables 4-5 minutes and add beans, tomatoes and spices. Stir well to coat veggies in seasoning and pour in tomato sauce. Bring chili to a boil. Add vegetable broth and reduce heat. Simmer chili on low for 20-25 minutes while you prepare the tempeh.

In a small sauce pan, bring 1 c. water and seasoning to a medium boil. Add tempeh and reduce heat to medium. Steam tempeh in seasoned water until tender, about 7-8 minutes. Pour entire contents of pan into food processor and pulse 5 times, scrape tempeh down and pulse another 5 times. Heat a skillet over medium high heat, coat with cooking spray and add ground tempeh. Cook until browned, another 10 minutes.

Returning to chili, turn heat off but leave pot on the stove. Add pinch of sugar and tempeh. Let sit on warm stove another 10 minutes to let the flavors blend and cool. Serve with assorted toppings and side of fries.


Perfect Oven-Baked Fries
Makes 4-6 servings
Cook time: 30-40 minutes

Ingredients

2 medium russet potatoes
Olive oil
Salt & Pepper

Directions

Preheat oven to 450 degrees.

Cut potatoes into wedges about 4” long and 1/4” thick. Coat with olive oil and generous pinch of salt and pepper. Spread on a non-stick baking sheet and bake for 20 minutes. Turn fries and bake another 10-15 minutes. Remove fries when dark golden brown and crispy.

Wednesday, June 2, 2010

Vegan Entertaining! Southwest Summer Spring Rolls & More

Hooray for another party! Another reason to cook! Another reason to EAT. Memorial Day has previously been an underappreciated holiday for me, but I now understand and value its critical timing (Hello…No days off between MLK Day and now?) and its All-American fervor. As stated in a recent post, I don’t explore American cuisine very much, but this holiday was calling me. So I set out to cook up some grub that could appeal to the average racecar lovin’, trucker hat wearin’, sunburn coated American. While throwing burgers and brats on the grill is the typical way to welcome summer, this vegan can’t pass up the chance to prove that meatless eats go beyond packaged goods and our options are more extensive than beans. Why would I just buy some tofu pups and veggie burgers when I could spend 6 hours cooking something way too elaborate for a simple pool party?

So in searching through Memorial Day menus and recipes, a few ensuing questions came to mind in my search for inspiration. What do my coworkers usually bring to potlucks? What do I normally see at picnics that I can never eat? Layered dip. Check! Rolls or wraps of sorts always laced with cream cheese or ground pork. Coleslaw, duh. And there never fails to be a scrumptious looking dessert that could so easily be made vegan if you replaced the butter with Earth Balance…which led to the following menu.
  • - 7 Layer Taco Dip
  • - Salsa and Queso
  • - Southwest Summer Rolls
  • - Purple Coleslaw
  • - Apple Crisp
 Holy cow did I binge on some taco dip. I also ate about 3 “practice” summer rolls before the party even started and I am still happily finishing the last of the purple slaw that somehow made it through as leftovers (ok it was a huge batch). I’m still not over that layered dip though. While I made my own vegan sour cream and taco seasoning, you could easily purchase toffuti, some pre-mixed seasoning and packaged seitan to make this super quickly. This queso is a perfected vegan nacho cheese recipe that I make about once a week by request from my token omnivore.


The purple coleslaw was the result of have too many veggies in the crisper in quantities too small to stand alone in any dish. So I combine red cabbage, broccoli stalks, carrots and cucumbers together in one happy purple mess. The dressing was based off a traditional recipe but made healthy by mixing in some leftover homemade vegan sour cream into a standard sweet red wine vinaigrette instead of loading it with a bunch of mayo and sugar.


The apple crisp – not much needs to be said. It’s like a traditional recipe but with Earth Balance instead of butter. Lots of oats on top with some pecans to boot. Crumble it up with some margarine and throw it over sliced apples. Delicious.

And the All-Star Summer Rolls…. Inspired by the famous Chile’s southwest egg roll appetizer, these were by far the favorite. I’ll admit I stumbled on the recipe for the Chile’s version and used it as a starting point. I added more veggies of course and replace the chicken with marinated tofu. I then baked them instead of deep-frying and served them without a dip – because they don’t need anything to cover up their deliciousness! These are super easy even if you make your own tofu. The assembly of course is the most time consuming, but this is worth it for special occasions. To save time, buy the pre-baked and pre-seasoned tofu whose texture is just right for these. I’d also recommend Daiya cheese for the filling: it’s my favorite.


Southwest Summer Rolls
Makes: 14-16 rolls
Prep time: 20 minutes
Cook time: 35 minutes

Ingredients

1 pkg. Extra Firm Tofu, pre-marinated and baked or homemade (recipe below)

1 T. Olive or canola oil
2 Green onions, sliced - white and green parts divided
2 Garlic cloves, minced
¾ c. Mixed bell peppers, diced
½ c. Corn, fresh or frozen (thawed)
½ c. Spinach, cooked or frozen (thawed)
½ tsp. Chili powder
½ tsp. Ground cumin
½ tsp. Salt
¼ tsp. Cayenne pepper
½ c. Vegan cheese, grated (i.e. Daiya - Italian)

1 pkg. Spring roll wrappers

Directions

If you are using pre-baked and marinated tofu, cut the block into ¼ inch thick slices, about 12-14 per block. Cut each individual slice into 3 or 4 matchsticks and set aside. For homemade baked tofu, do not cut into matchsticks until you have baked the tofu. To make your own marinated baked tofu, see below.

To make the filling, heat the olive oil over medium-high heat and sauté onions, garlic and peppers until vegetables are just tender, 4-5 minutes. Add corn, spinach and spices and cook until corn and spinach are heated through (the peppers should not be al dente but not mushy). Remove from heat and transfer to a medium bowl. While mixture is still hot, fold in vegan cheese until well blended and melted. Set aside.

Preheat oven to 375ºF.

To assemble, place one spring roll wrapper on a plate or cutting board. Have a small bowl of water and a brush set aside to help seal the rolls. Fill each wrapper with 2 T. of filling and 3-4 pieces of tofu. Brush the top edge with water, about ½ inch down. Starting at the bottom, fold the bottom edge over the filling and secure the filling tightly. Fold each side of the wrapper over the outside edges of the filling and finish by rolling upwards. Press the edge firmly and set aside. Repeat with remaining wrappers. Brush each with canola oil or coat all sides with cooking spray. Bake for 10-13 minutes or until starting to brown. Turn the rolls over and bake an additional 10-13 minutes, or until rolls are golden and crispy.


Marinated Baked Tofu
Makes: 12-16 slices
Prep time: 5 minutes
Cook time: 30 minutes

Ingredients

1 pkg. Extra-firm tofu, sliced into ¼ inch thick rectangles

¼ c. White wine or sherry
3 T. Red wine vinegar
3 T. Olive or canola oil
2 T. Soy sauce
2 T. c. Lemon or lime juice, Freshly squeezed
1 tsp. Chili powder*
1 tsp. Ground cumin*
½ tsp. Garlic powder
½ tsp. Onion powder
½ tsp. Paprika*
½ tsp Salt
½ tsp. Black or cayenne pepper

* Note: This is a southwest marinade. The recipe can be used for any dish by toning down the southwest spices. For a basic marinade, only add onion and garlic powders, salt and pepper.

Directions

Preheat oven to 450ºF.

Place tofu on paper towels and cover with additional paper towels. Pat dry to ensure most of moisture is removed. Place slices in a glass baking dish and set aside.

Whisk all marinade ingredients together and adjust seasoning to taste. Pour over tofu and flip tofu over to coat all sides. Bake for 15 minutes and flip tofu pieces. Bake an additional 15 minutes or until all the marinade is absorbed.